Thursday, 15 September 2011
How to Move Data from Google Apps to Google Account After Transition.
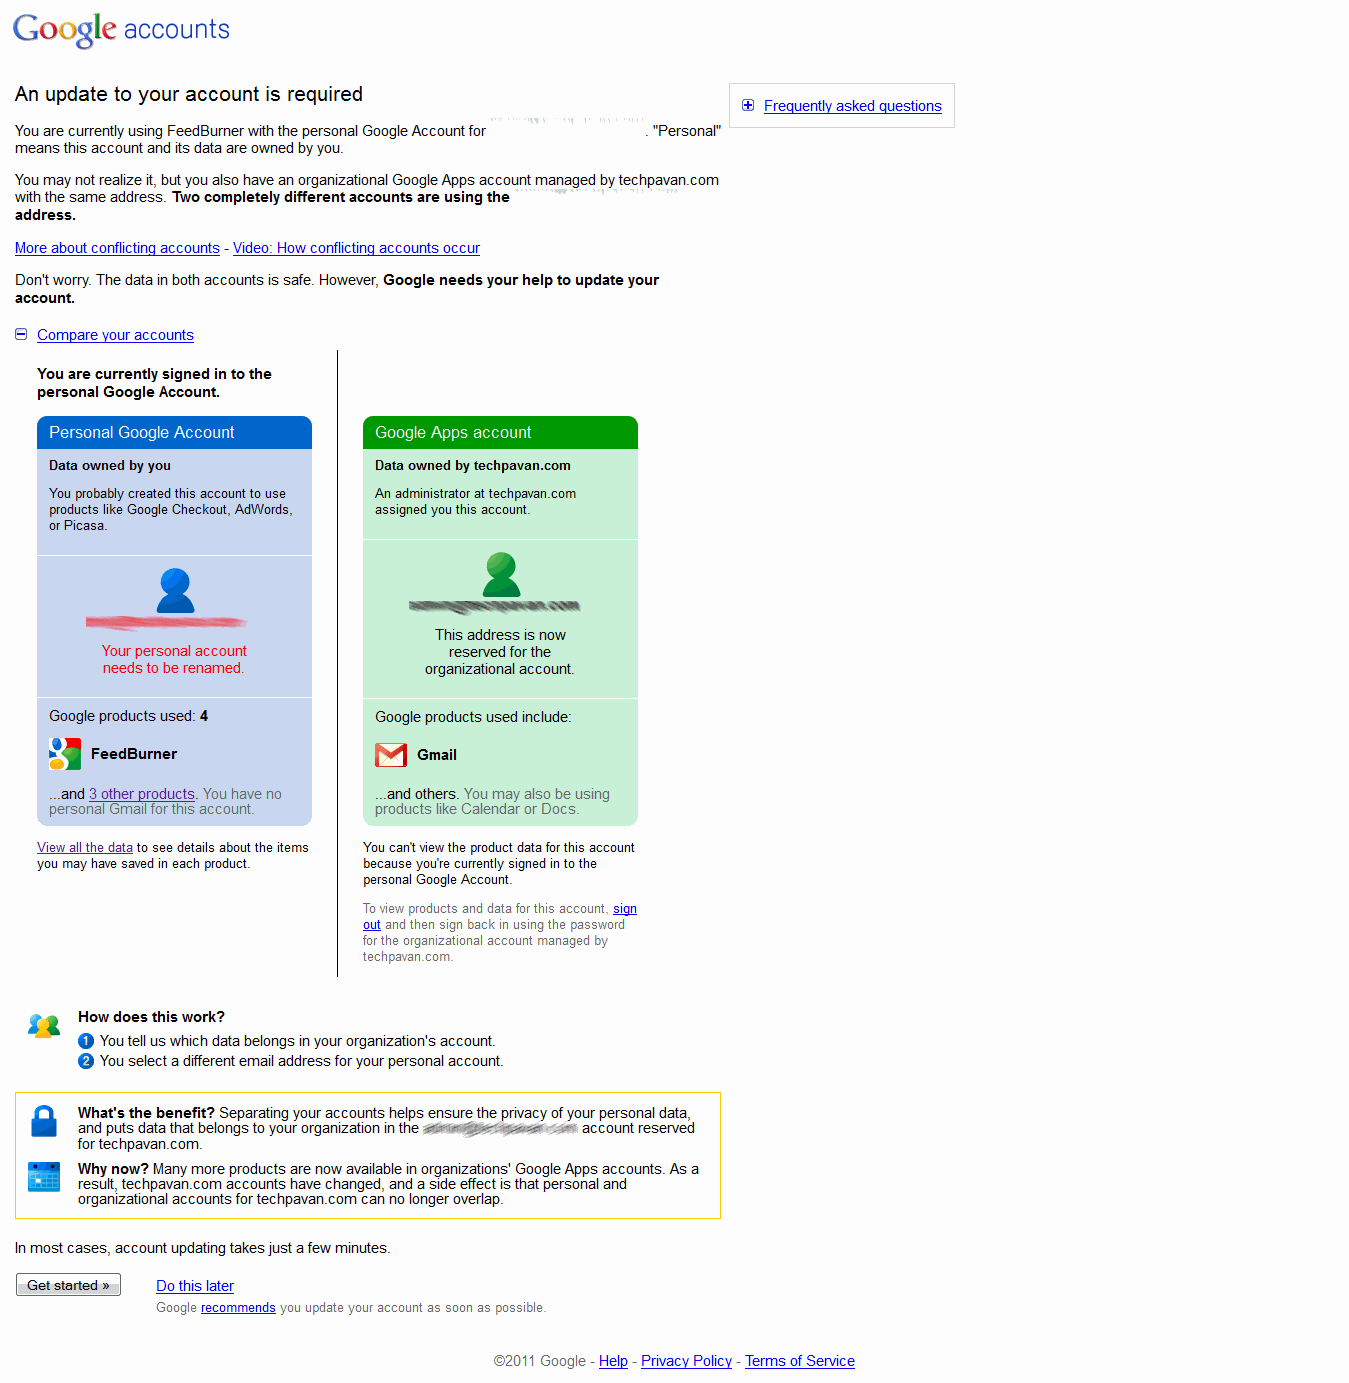
As Google is into transition of Google Apps to Google Accounts, there are few users who already have a personal account with the domain email address which they cannot continue to use as the email will be used by the organizational account. Such accounts are called conflicting accounts. If your organization has one or more such conflicting accounts, here is the way how users can move most of the application related user data to organizational account or another existing Google account.
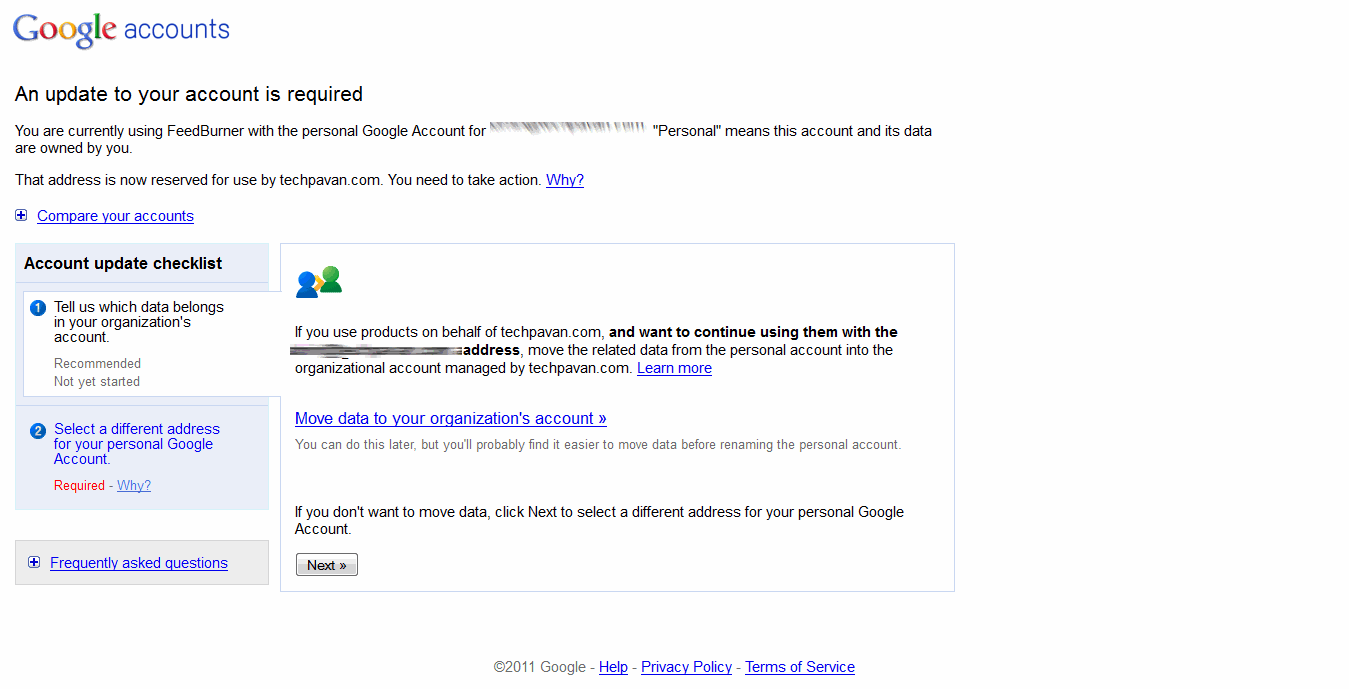
Once the user logs in to his conflicting account, he will be prompted about the account update by comparing both the accounts and the products associated with them. Click on get started will take to the options related with the update. (If you don’t get this prompt, you can alternately do that by clicking on move data on Google Dashboard). If you are stuck somewhere here, probably you have already tried data move and conflicting account has been renamed. In this case, your conflicting account email would beuser%example.com@gtempaccount.com if your domain email is user@example.com.
User can move the data to either the organizational or another personal account. The new personal account will be an existing Google account without gmail.com or a new Google account with gmail.com. The data cannot be moved to an existing gmail.com account. Next steps here demonstrate data move from personal to organizational account.

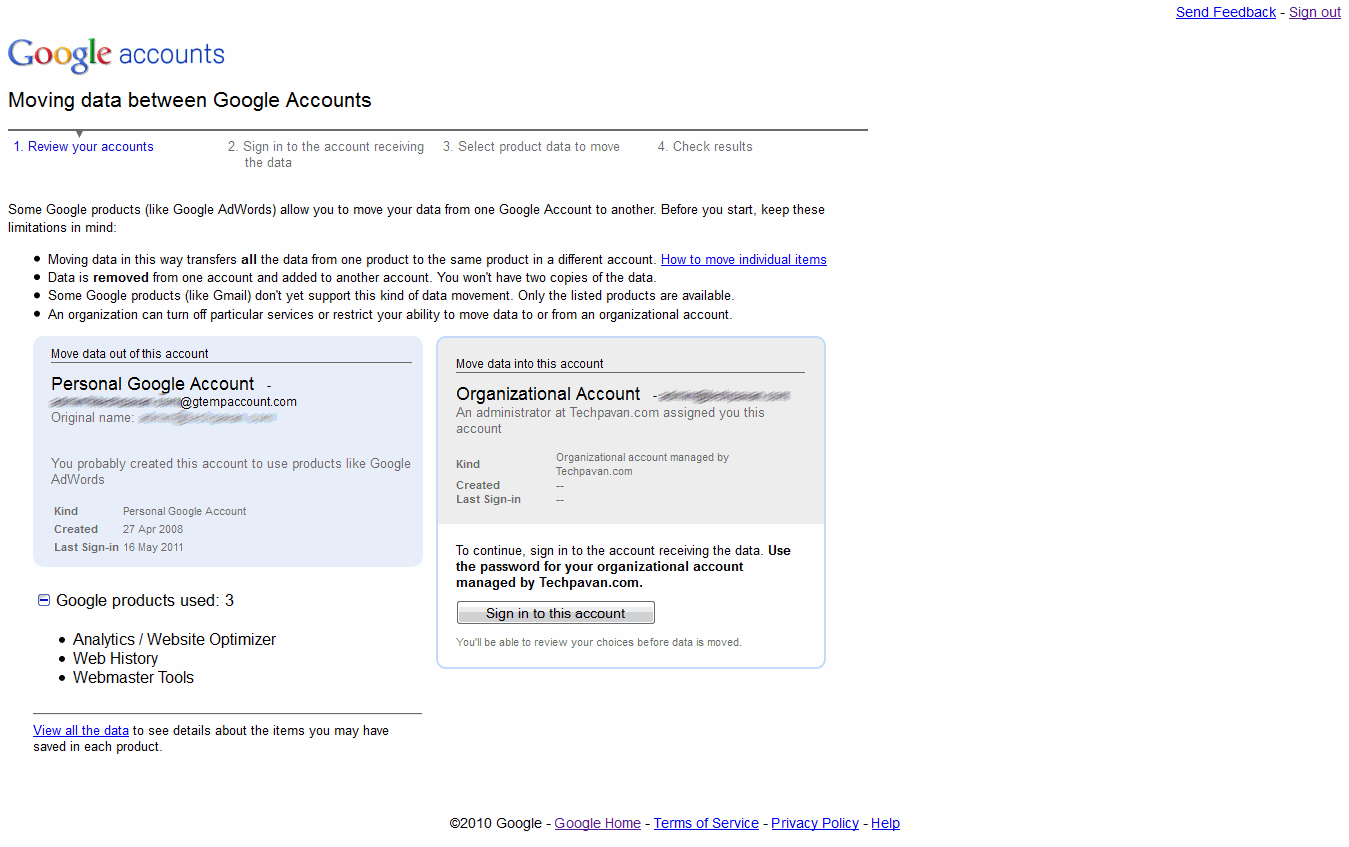
Next, a review about both the accounts will be displayed and you have to sign in to your organizational account. Click on sign in to this account on organizational account section and provide your current Google Apps credentials to sign in.
Check all the products you want to migrate and check the other declarations and move the data.
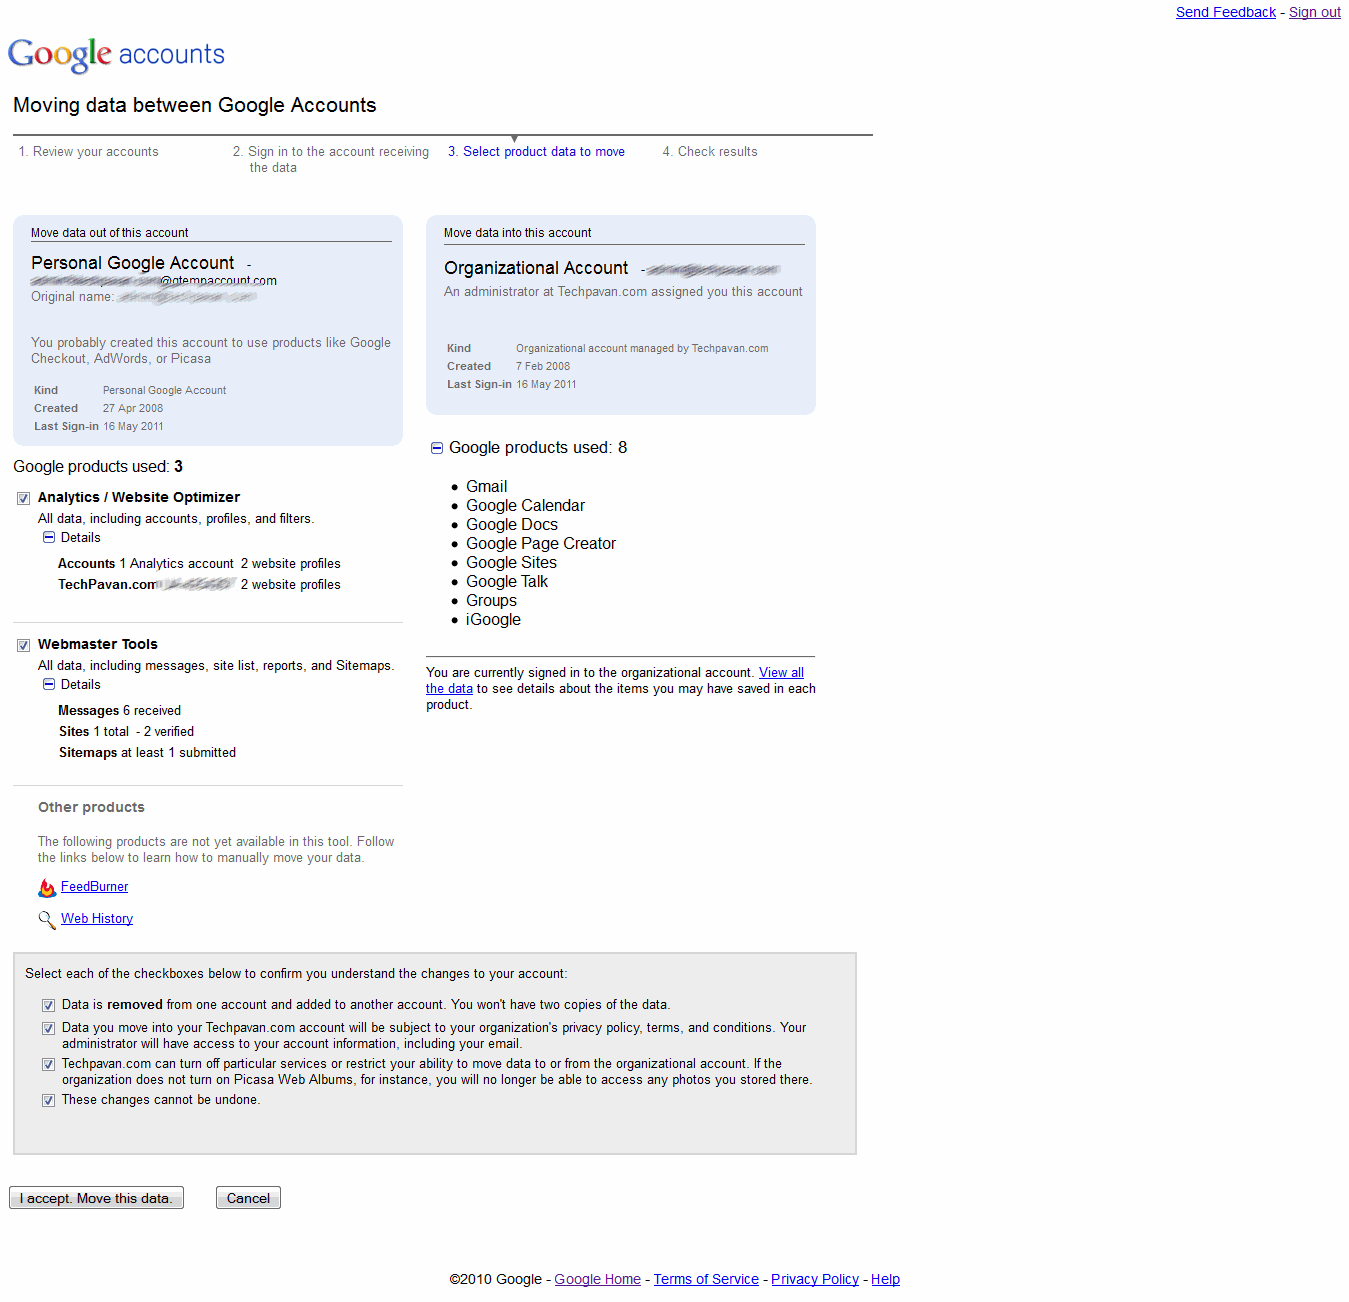
The data transfer tool does not support all Google applications. For unsupported applications, you can move the data manually.
Note: The data move process should be handled at the user level and admin will not have any privileges to move the user data. Admin will not even be aware of which users are having conflicts, but he will be notified about the number of users with conflicts during transition.
The video below can explain more on conflicting accounts.
How to see ‘Web Pages’ in 3D with Tilt, a Mozilla Firefox Extension.
There is an experimental Firefox extension called ‘Tilt’ that let you visualize your web pages in 3D. This add-on only works with Firefox 3.6.18 or later versions.
Is this possible to visualize your web pages in 3D ? Yes, today I am here with very interesting topic i.e. “How to see ‘Web Pages’ in 3D with Tilt?”
The very first step is that, download xpi file to your computer, after that simply drag it to your Firefox window to complete the installation. When you open a web page, you have to press Ctrl + Shift + M to activate the 3D navigation controls.

Then use arrow keys on your keyboard to pan, zoom or rotate that page in any direction or you can also use your mouse.
This extension reads the page’s HTML structure , then turns all the DIV layers, ULs and other tags into 3D stacks, that add virtual depth to the page. You can download the source code for the extension ‘Tilt’ on github.
How To Check Folder Size in Windows 7, Vista – Compare Directory Size.
Check Folder size in your windows 7 & Vista. One very important feature which windows has never come up with – displaying the directory size on explorer and sorting according to folder size. This sometimes is a very important feature which can save a lot of time which we spend on viewing individual folder properties.
 |
The most possible reason we check individual directory size is when we are running out of disk space and there is a need to clear off some unwanted data stored. Having every folder size information available can help in identifying the content which occupy most space and cleaning up the same.
Folder size is a small free windows utility to check and compare folder size on any disk or directory. This tool can display the folder size, file size and the percentage of space occupied by it in the contained directory. On opening the tool, you need to choose the disk to scan and it will take some time based on the disk space. Once the scanning is complete, you will be able to see the folder and file size along with the percentage of space occupied. You can navigate to sub folders, open the folder in explorer, view properties and delete the folder or individual files.
There is a neat visual interface with an animated pie chart or bar chart of the folder space occupation. The application also has a context menu integration to help you in quick scanning any folder from the windows explorer. This also shows the number of files, folders and subfolders and you can navigate between them using normal back, forward and up one level buttons.
How to block all Applications on Facebook
Hear is an trick how to block your applications on facebook , So just check it .
When a user turn off the Facebook Applications platform, it will also cripple the miscellaneous social plugins that assistance you ‘like’ stories on other sites.

When a user turn off the Facebook Applications platform, it will also cripple the miscellaneous social plugins that assistance you ‘like’ stories on other sites.
Sometimes, We extremely dislike getting Facebook application invitation requesting by a friend to install an application even you don’t have interest on that.
Today, I am here with a topic to stop all those annoying application on Facebook.
Today, I am here with a topic to stop all those annoying application on Facebook.
You can see the points given below to disable the Facebook applications platform:
- First you have to log in to your Facebook account
- Secondly, select ‘Privacy Settings’ under ‘Account’
- click on ‘Edit your settings’ under the ‘Applications and Websites’ section
- then click on ‘turn off ‘ all the platform applications.
Google TV: serious rivals and serious questions
 Curation has been the buzzword in broadcast platform circles for some time – the sheer amount of television channels is causing users enough problems, and when you factor in video on demand that becomes exponentially more difficult.Google TV's launch was beset by bluetooth problems - but with some serious rivals in the UK and many questions about how the hurdles between internet and television are cleared, those connection errors may not be the only troubles it faces.
Add in all of the video on demand and streaming content from the web and you realise that perhaps the only suitable way to deal with the information is with search – the tool that has made the internet accessible.
Obviously Google has a key advantage in this area, so I was intrigued to see exactly what Google TV could provide.
Cool concepts
Let's be frank – there was some wildly cool concepts on show; Google's app market is becoming as convergent as the company's plans and using Android as the base of Google TV may be a masterstroke, bringing apps that the public already understands.
Voice search, YouTube Leanback, being able to send a video from your mobile to your TV and vice versa, Google TV certainly has its highlights.
But, in light of many of the other TV innovators' early efforts this year, the same problems that have beset IPTV and bringing the web to the biggest screen in your living room, are still present and accounted for.
UK blessed
The UK is blessed with one of the most cutting-edge television markets. In the blue corner you have Sky, pushing 3D, a global leader in HD and a company that took PVRs and made them simple for the British consumer.
Over in the red corner is Virgin, a company with the flagship broadband product for the nation, an exciting future in partnership with TiVo and an already impressive on-demand service through cable.
And in the (possibly) neutral corner is the BBC, a globally unique setup that is publicly funded and involved in not only the likes of Freeview and Freesat, but also the big hope for UK IPTV – Project Canvas.
All three of these big hitters are developing IPTV-like solutions that bear comparison with Google TV – and all three have hit the same kind of problems.
Namely, how much of an internet experience actually works on a television set, and can you get a decent user experience with the wealth of video content already available on the web?
Less than standard
Let's start with the latter – a YouTube app is by no means a rare sight on the newest televisions, and although the latest material has a better chance of being in HD, the majority is certainly not of a particularly high standard.
On a computer screen that's not a massively big deal, but when your screen is a 1080p 42-inch Panasonic and you've got used to HD content, it certainly jars.
Google obviously acknowledged that YouTube in its online form is not suitable for televisions – hence the creation of YouTube Leanback, and it does have the power to make some web video significantly better in quality.
But as quality goes up, so does bandwidth, and unless the video site is set up for televisions then you need to either explain to consumers why their video is running in a box on the Amazon site, or find some way of adapting the player.
It's a tricky situation – and even in the Google TV demonstration, the simple way of switching between traditional TV and video on demand through a website that wasn't YouTube looked less than ideal.
Browsers
Browsers on televisions also cause a large number of arguments; many people, myself included, don't really object to a full browser experience – and the excellent Opera-based Wii browser or the competent PS3 have illustrated that, to some degree at least, this works.
But many people find them difficult and an old argument, often referred to as lean back versus lean forward, rears its head.
Essentially, we lean forward to use our computers and actively peer at what we are doing, built with a TV we lean back and let it wash over us. The argument is clearly reference in the latest YouTube announcement, but it remains at the heart of IPTV discussions.
Curation
And finally 'curation' - the horrible marketing term for just how we actually find the programmes that we want to watch among 500 television channels, thousands of hours of on-demand and the internet's practically endless archives.
Virgin Media's TiVo-powered interface will, almost certainly, use search as the central way of finding content – and, like Google TV, will offer paid for VOD, its own on-demand, linear channels and some internet video (TiVo taps into YouTube for example).
Tuesday, 13 September 2011
Keyboard Shortcuts For Easy Access
CTRL+C (Copy)
CTRL+X (Cut)
CTRL+V (Paste)CTRL+Z (Undo)
DELETE (Delete)
SHIFT+DELETE (Delete the selected item permanently without placing the item in the Recycle Bin)
CTRL while dragging an item (Copy the selected item)
CTRL+SHIFT while dragging an item (Create a shortcut to the selected item)
F2 key (Rename the selected item)
CTRL+RIGHT ARROW (Move the insertion point to the beginning of the next word)
CTRL+LEFT ARROW (Move the insertion point to the beginning of the previous word)
CTRL+DOWN ARROW (Move the insertion point to the beginning of the next paragraph)
CTRL+UP ARROW (Move the insertion point to the beginning of the previous paragraph)
CTRL+SHIFT with any of the arrow keys (Highlight a block of text)
SHIFT with any of the arrow keys (Select more than one item in a window or on the desktop, or select text in a document)
CTRL+A (Select all)
F3 key (Search for a file or a folder)
ALT+ENTER (View the properties for the selected item)
ALT+F4 (Close the active item, or quit the active program)
ALT+ENTER (Display the properties of the selected object)
ALT+SPACEBAR (Open the shortcut menu for the active window)
CTRL+F4 (Close the active document in programs that enable you to have multiple documents open simultaneously)
ALT+TAB (Switch between the open items)
ALT+ESC (Cycle through items in the order that they had been opened)
F6 key (Cycle through the screen elements in a window or on the desktop)
F4 key (Display the Address bar list in My Computer or Windows Explorer)
SHIFT+F10 (Display the shortcut menu for the selected item)
ALT+SPACEBAR (Display the System menu for the active window)
CTRL+ESC (Display the Start menu)
ALT+Underlined letter in a menu name (Display the corresponding menu)
Underlined letter in a command name on an open menu (Perform the corresponding command)
F10 key (Activate the menu bar in the active program)
RIGHT ARROW (Open the next menu to the right, or open a submenu)
LEFT ARROW (Open the next menu to the left, or close a submenu)
F5 key (Update the active window)
BACKSPACE (View the folder one level up in My Computer or Windows Explorer)
ESC (Cancel the current task)
SHIFT when you insert a CD-ROM into the CD-ROM drive (Prevent the CD-ROM from automatically playing)
Dialog Box Keyboard Shortcuts
CTRL+SHIFT+TAB (Move backward through the tabs)
TAB (Move forward through the options)
SHIFT+TAB (Move backward through the options)
ALT+Underlined letter (Perform the corresponding command or select the corresponding option)
ENTER (Perform the command for the active option or button)
SPACEBAR (Select or clear the check box if the active option is a check box)
Arrow keys (Select a button if the active option is a group of option buttons)
F1 key (Display Help)
F4 key (Display the items in the active list)
BACKSPACE (Open a folder one level up if a folder is selected in the Save As or Open dialog box)
Microsoft Natural Keyboard Shortcuts
Windows Logo (Display or hide the Start menu)
Windows Logo+BREAK (Display the System Properties dialog box)
Windows Logo+D (Display the desktop)
Windows Logo+M (Minimize all of the windows)
Windows Logo+SHIFT+M (Restore the minimized windows)
Windows Logo+E (Open My Computer)
Windows Logo+F (Search for a file or a folder)
CTRL+Windows Logo+F (Search for computers)
Windows Logo+F1 (Display Windows Help)
Windows Logo+ L (Lock the keyboard)
Windows Logo+R (Open the Run dialog box)
Windows Logo+U (Open Utility Manager)
Right SHIFT for eight seconds (Switch FilterKeys either on or off)
Left ALT+left SHIFT+PRINT SCREEN (Switch High Contrast either on or off)
Left ALT+left SHIFT+NUM LOCK (Switch the MouseKeys either on or off)
SHIFT five times (Switch the StickyKeys either on or off)
NUM LOCK for five seconds (Switch the ToggleKeys either on or off)
Windows Logo +U (Open Utility Manager)
Windows Explorer Keyboard Shortcuts
END (Display the bottom of the active window)
HOME (Display the top of the active window)
NUM LOCK+Asterisk sign (*) (Display all of the subfolders that are under the selected folder)
NUM LOCK+Plus sign (+) (Display the contents of the selected folder)
NUM LOCK+Minus sign (-) (Collapse the selected folder)
LEFT ARROW (Collapse the current selection if it is expanded, or select the parent folder)
RIGHT ARROW (Display the current selection if it is collapsed, or select the first subfolder)
After you double-click a character on the grid of characters, you can move through the grid by using the keyboard shortcuts:
RIGHT ARROW (Move to the right or to the beginning of the next line)
LEFT ARROW (Move to the left or to the end of the previous line)
UP ARROW (Move up one row)
DOWN ARROW (Move down one row)
PAGE UP (Move up one screen at a time)
PAGE DOWN (Move down one screen at a time)
HOME (Move to the beginning of the line)
END (Move to the end of the line)
CTRL+HOME (Move to the first character)
CTRL+END (Move to the last character)
SPACEBAR (Switch between Enlarged and Normal mode when a character is selected)
CTRL+N (Open a new console)
CTRL+S (Save the open console)
CTRL+M (Add or remove a console item)
CTRL+W (Open a new window)
F5 key (Update the content of all console windows)
ALT+SPACEBAR (Display the MMC window menu)
ALT+F4 (Close the console)
ALT+A (Display the Action menu)
ALT+V (Display the View menu)
ALT+F (Display the File menu)
ALT+O (Display the Favorites menu)
CTRL+P (Print the current page or active pane)
ALT+Minus sign (-) (Display the window menu for the active console window)
SHIFT+F10 (Display the Action shortcut menu for the selected item)
F1 key (Open the Help topic, if any, for the selected item)
F5 key (Update the content of all console windows)
CTRL+F10 (Maximize the active console window)
CTRL+F5 (Restore the active console window)
ALT+ENTER (Display the Properties dialog box, if any, for the selected item)
F2 key (Rename the selected item)
CTRL+F4 (Close the active console window. When a console has only one console window, this shortcut closes the console)
CTRL+ALT+END (Open the m*cro$oft Windows NT Security dialog box)
ALT+PAGE UP (Switch between programs from left to right)
ALT+PAGE DOWN (Switch between programs from right to left)
ALT+INSERT (Cycle through the programs in most recently used order)
ALT+HOME (Display the Start menu)
CTRL+ALT+BREAK (Switch the client computer between a window and a full screen)
ALT+DELETE (Display the Windows menu)
CTRL+ALT+Minus sign (-) (Place a snapshot of the active window in the client on the Terminal server clipboard and provide the same functionality as pressing PRINT SCREEN on a local computer.)
CTRL+ALT+Plus sign (+) (Place a snapshot of the entire client window area on the Terminal server clipboard and provide the same functionality as pressing ALT+PRINT SCREEN on a local computer.)
CTRL+B (Open the Organize Favorites dialog box)
CTRL+E (Open the Search bar)
CTRL+F (Start the Find utility)
CTRL+H (Open the History bar)
CTRL+I (Open the Favorites bar)
CTRL+L (Open the Open dialog box)
CTRL+N (Start another instance of the browser with the same Web address)
CTRL+O (Open the Open dialog box, the same as CTRL+L)
CTRL+P (Open the Print dialog box)
CTRL+R (Update the current Web page)
CTRL+W (Close the current window)
Google Authenticator App Turns Your iPhone Into a Security For Your Google account
Google Authenticator App Turns Your iPhone ,for Iphone 4, 3GS& 3G. And iOS 4.0 and more
Google launched an advanced security feature called two-step verification system earlier in the year for Gmail and Google Apps (last year) that makes your Google Account significantly more secure by providing an additional layer of security.
This two-way verification is not new. Quite a few banks have been using this system for quite a while, allowing users to access their website using a unique passcode generated by a security token given by the bank and the password. Last month, Google released an iPhone app called Google Authenticator for the two-step verification for the iPhone. Google Authenticator app basically turns your iPhone into a security token and generates a unique passcode for the two-step verification.
The two-step verification process relies on something you know (your password) and something you have (your mobile phone).
You can checkout how the two-step verification system works in the demo video:You may also go through the the details about the two-step verification system on this webpage on Google's website before setting it up.
It is highly recommended that you enable the two-step verification if you have a Google Account. The entire setup process does not take more than 5 to 10 minutes. And if you do then Google Authenticator is a must-have app and you can download it from the App Store for free using this iTunes link. You can also use the app on your iPad oriPod touch.
Please stay safe and pass this around to your family and friends who have a Google Account as well.
Subscribe to:
Posts (Atom)


