Showing posts with label Iphone. Show all posts
Showing posts with label Iphone. Show all posts
Monday, 19 September 2011
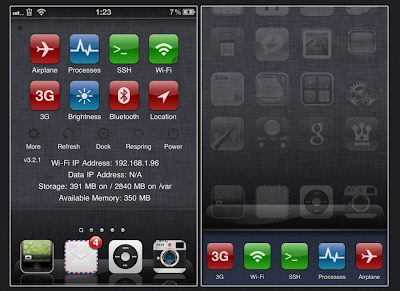
Download, Install, and Change SBSettings Theme
If you are rocking a jailbroken iPhone, iPad, or iPod Touch, then you must have SBSettings installed on your device. If you are unaware, SBSettings app will allo you to control vital settings of your iOS device as easy as swiping your finger on the screen. However, the one thing I don’t care for in SBSettings is the application’s default theme. It’s pretty boring and ugly. But fortunately, just like the User Interface / springboard of the iOS, you will also be able to theme SBSettings with the help of Cydia. So if you want to theme your SBSettings, then just follow the step-by-step guide posted below:
Jailbreak iOS Device
Since SBSettings is available only in Cydia App Store, you must have a jailbroken iPhone or iPod Touch in order to access Cydia to install this great app. If you don’t have a jailbroken iOS device then you can follow our step-by-step guide to untether jailbreak iOS 4.2.1 on iPhone, iPod Touch or iPad using Redsn0w 0.9.7 orGreenpois0n RC5. Or if you rely on Ultrasn0w carrier unlock, you must jailbreak your iOS device using the recently released PwnageTool 4.2 for Mac OS X for iOS 4.2.1 and with PwnageTool bundle for iOS 4.3 orSn0wbreeze 2.2 and Sn0wbreeze 2.3 for iOS 4.3 on Windows.
How to Download SBSettings Themes
Step 1: Launch Cydia app on the Springboard of your iOS device then tap on Sections.
Step 2: Now Scroll down to themes and look for a section for “Themes (SBSettings)”. Browse through all the available SBSettings themes and install the theme you like for your device.
How to Change SBSettings Theme
Step 1: Now, launch SBSettings by swiping to the right or left on your top status bar. And then tap on “More” option.
Step 2: Then simply tap the “SBSettings Themes” option to see numerous default SBSettings themes and the theme you previously installed.
Step 3: You can also preview the theme you like by tapping the blue arrow.
Step 4: Tap on the theme that you prefer to install it.
Step 5: Then respring your device to activate the new SBSettings theme.
That’s it. You already themed your SBSettings. Enjoy!
Tuesday, 13 September 2011
Google Authenticator App Turns Your iPhone Into a Security For Your Google account
Google Authenticator App Turns Your iPhone ,for Iphone 4, 3GS& 3G. And iOS 4.0 and more
Google launched an advanced security feature called two-step verification system earlier in the year for Gmail and Google Apps (last year) that makes your Google Account significantly more secure by providing an additional layer of security.
This two-way verification is not new. Quite a few banks have been using this system for quite a while, allowing users to access their website using a unique passcode generated by a security token given by the bank and the password. Last month, Google released an iPhone app called Google Authenticator for the two-step verification for the iPhone. Google Authenticator app basically turns your iPhone into a security token and generates a unique passcode for the two-step verification.
The two-step verification process relies on something you know (your password) and something you have (your mobile phone).
You can checkout how the two-step verification system works in the demo video:You may also go through the the details about the two-step verification system on this webpage on Google's website before setting it up.
It is highly recommended that you enable the two-step verification if you have a Google Account. The entire setup process does not take more than 5 to 10 minutes. And if you do then Google Authenticator is a must-have app and you can download it from the App Store for free using this iTunes link. You can also use the app on your iPad oriPod touch.
Please stay safe and pass this around to your family and friends who have a Google Account as well.
iPhone Error 3194 Solution
I am sharing you new trick and solution for your iphone 3GS & 3G. Now you can fix error easily, no need to go out and pay for all small things.
In order to fix the Error 3194 and enable the users to downgrade iOS 4 to 3.1.3, you need to follow the steps discussed below.
It is important to note that this solution is applicable to all the operating systems and any version you are using.
Now quickly follow these steps:
* First, you have to quit iTunes.
* In Mac OS X, search out for host file: /etc/hosts
* If you are using Windows OS,then locate c:\windows\system32\drivers\etc\hosts
* Now using the administrator privileges open the host files.
* Now, at the bottom of the host file, you have to add the following line:
* 74.208.105.171 gs.apple.com
* Once you have done this, connect your iPhone to your computer or laptop.
* Plus, now launch the iTunes.
* Now put your iPhone in the Device Firmware Upgrade (DFU) mode.
* In order to put the phone in DFU mode, first turn off the phone.
* Now hold the Home and Power button simultaneously for exactly 10 seconds.
* The computer should give you a beep sound and the screen would turn black and blank.
* Now you are in the DFU mode.
* Now use the normal Restore option in iTunes.
* After your upgrade is finished, you will have to remove “74.208.105.171 gs.apple.com” from your host files.
* This will update the iTunes properly.
* This is the IP address of signing server to associate with apple.com
This process is applicable to iPad and iPod as well.
So, now that you have learnt this process, you can be free from Error 3194.
Subscribe to:
Posts (Atom)


